Tracing & Logging
Mertech offers several reporting options:
A migration report to log the status of a migration.
A driver trace to log driver calls while running any DataFlex program.
Event logging when in “Service Mode”
Debug channel output to view realtime driver operations.
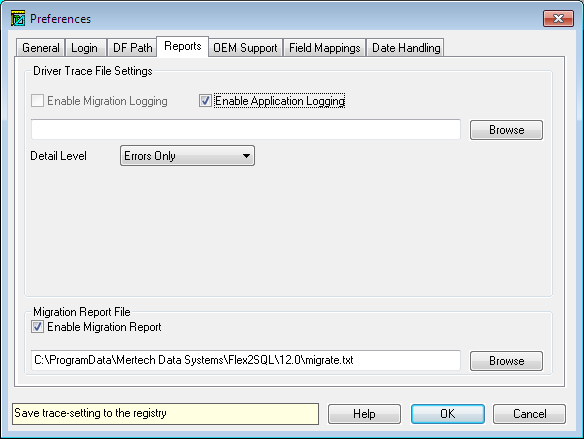
The first option is enabled in the Tools > Preferences > Reports tab of the Flex2SQL Classic Migration Utility. The other options can be enabled via code changes or using environment variables or the Trace Utility.
Migration Report
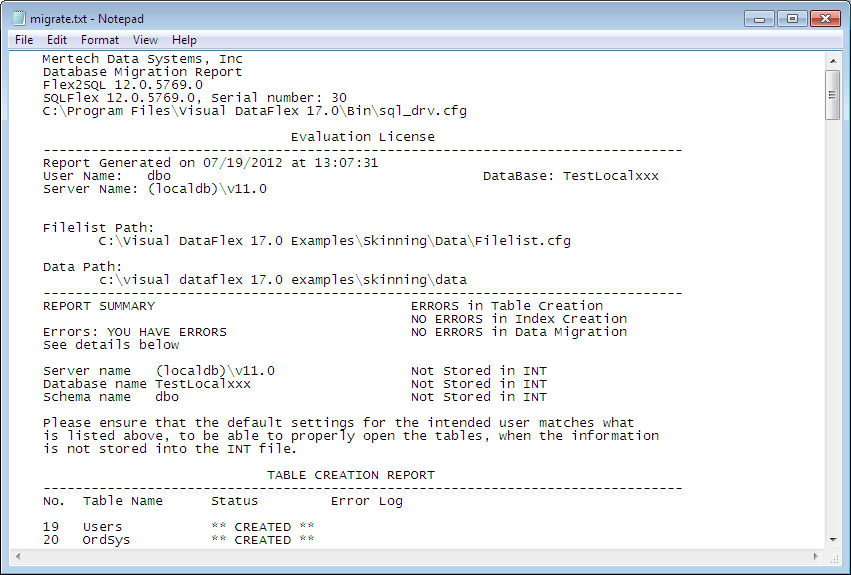
The migration report gives users a complete picture of the migration process. It is no longer necessary to analyze the migration process on a table-by-table basis. This report displays any errors that may have occurred during the migration(s), the license and version of the migration tool, a table creation report, an index creation report, and a data migration report.
There is a summary at the top of the report that lets you know right away if there are any errors in the migration, you do not have to search through the whole report to check for errors. You can print and save the report text file. The report provides details on table and index creation along with a comparison of the number of records migrated with the number of records in the DataFlex files. If a process fails for any reason, the STATUS column shows the status as “FAILED” and the ERROR LOG column indicates the error generated.
Enabling the Migration Report
Select Tools > Preferences > Reports tab.
Select the Enable Migration Report checkbox.
Click Browse to select a location for the migration report to be saved.
Type the name for the report text file.
Select the detail level needed, a good place to start is Detailed 2.
Click OK.
Once the migration is complete, select Reports > Migration Report to view the report.
Clearing the Migration Report
Each time you perform a migration for the selected file(s) a new migration report is appended to the end of the previous migration report. In order to start with a fresh, blank report, you need to select Reports > Clear Migration Report. The following image shows a sample migration report.
Driver Trace
The driver trace log is one of the most useful tools available to you while migrating data, and while developing and maintaining your application. It gives you an inside look into what the driver is doing, but also what your application is doing. This can be turned on during a migration, or used at any other time alongside your application or the Dataflex toolset. Mertech’s drivers have various levels to define tracing granularity.
The Errors Only option is especially useful during migration as it logs only the errors rather than all driver calls to the server. If bad data is encountered during migration, the target backend raises an error. On receiving this error, the driver logs the contents of the record buffer to the file and moves on to the next file. Migration for that file stops right after the error. The user can look at the trace file, correct the data in the DataFlex file, and then run the migration process on the file again. The most common problems are in data fields.
Note
In the event you’re receiving an error from the server and the nature of the problem is unclear, Mertech recommends you run the driver trace first and then contact Mertech Technical Support. Any error returned by the server should first be looked up in the server documentation for clarification before contacting Mertech.
Enabling Driver Trace for Migration Logging
Select the Enable Migration Logging checkbox in the Flex2SQL Classic Migration Utility Tools > Preferences > Reports tab to log errors during the migration process.
Enabling Driver Trace for Application Logging
If you’re getting an error while running any DataFlex program and the error message or text is not clear, turn on driver tracing for applications.
Note
The application logging option severely affects performance if left on and generates very large trace files. Remember to turn this off once you have generated the trace you need. To reduce the load on your application, you can log to the debug channel instead of logging to a file which is much faster and has a minimal effect on the performance of your application.
There are several ways to enable application logging.
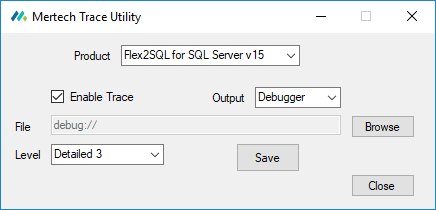
Use the Mertech Trace Utility to turn logging on and to set the logging level.
Specify the trace file and trace level, then click Save.

You can also turn on application logging by setting an environment variable TRACE_ON.
For Windows:
SET TRACE_ON=<TracefileName>
SET TRACE_LEVEL=1 (see also *Selecting the Trace Level*)
For LINUX:
TRACE_ON=<TracefileName>; export TRACE_ON
TRACE_LEVEL=1; export TRACE_LEVEL
Note
Variable names must be all in uppercase because LINUX is case sensitive.
Using commands f2s_trace_on, f2s_write_trace_ln, and f2s_trace_off within your DataFlex application:
f2s_trace_on "<tracefilename>" <tracelevel>
Where <tracelevel> is one of ERROR_LEVEL, DEBUG_LEVEL, DETAIL_LEVEL1, DETAIL_LEVEL2, or DETAIL_LEVEL3. This option allows a developer to turn tracing on and off from inside an application. Custom trace messages can also be sent to the trace file:
f2s_write_trace_ln "<trace message>"
These messages can help to pinpoint where the driver is in relation to the application when troubleshooting a particular function.
For example:
Use f2s.pkg

// Using ENABLE_TRACE_ON and DISABLE_TRACE_ON
// Note that LOGIN or LOAD_DRIVER must be called
// before turning on the trace either explicitly or implicitly
// through an OPEN command of a migrated table
f2s_trace_on "C:\testsql.log" DEBUG_LEVEL
Open SALESP
f2s_write_trace_ln “Open completed”
Close SALESP
f2s_trace_off Enabled
You can also use settings in the MERTECH.INI file (Trace_on, Trace_Level, and Trace_Flush) to control application logging. Refer to MERTECH.INI for additional information.
Note
Using the Mertech Trace Utility control tracing does not work with WebApp. To enable tracing within a Webapp, consider using commands embedded within your application, environment variables or settings in MERTECH.INI
Selecting the Trace Level
If you only want to log the errors you can do so by selecting detail level Errors Only in the Reports tab or by setting TRACE_LEVEL to -1. No other information is included in the log file. The message(s) are preceded by ‘ERROR’ or ‘WARNING’. This option reduces the size of the log file.
The following trace levels are available. Each level includes the previous level’s information.
Detail Level |
TRACE_LEVEL |
Logs |
|---|---|---|
ERROR_LEVEL |
-1 |
Errors and warnings only. |
DEBUG_LEVEL (default) |
0 |
All the database calls issued by the application (like FINDs, SAVEs and DELETEs, LOGIN, LOGOUT) and the embedded SQL calls, along with the call parameters. |
DETAIL_LEVEL1 |
1 |
Information about the MOVE commands from/to file field buffers and the calls to the Get_Attribute and Set_Attribute commands. |
DETAIL_LEVEL2 |
2 |
Text file generation through the driver. |
DETAIL_LEVEL3 |
3 |
All calls to the driver and when they start and when they finish. |
Tracing to the Windows Debug Channel
Starting in version 15 of Flex2SQL, you can now trace to the Windows debug channel instead of output to a file. To enable this mode, use the Mertech Trace Utility.
The Mertech Trace utility can also be used to direct trace output to a file. To view the trace output sent to the debug channel, you’ll need to use a 3rd party utility such as DebugView or DebugView++ (both free). You can also programmatically send the output to the debug channel:
Use f2s.pkg
// Note that LOGIN or LOAD_DRIVER must be called
// before turning on the trace either explicitly or implicitly
// through an OPEN command of a migrated table
f2s_trace_on "debug://" DETAIL_LEVEL3
Open SALESP
f2s_write_trace_ln “Open completed”
Close SALESP
f2s_trace_off
The advantages of outputting to the debug channel include:
Immediacy: you’re able to see debug output in realtime as the messages are generated.
Logging Options: The 3rd party utilities let you control how the output is saved in a variety of ways. For instance, you could set a maximum log file size, have the log file automatically compressed to a zip file after reaching a certain size, rotate the log file, and more!
Thriftly/Webapp Support Improved: Using the debug channel you’re able to tell which process output the log messages so you can debug a running web application that has process pooling turned on.
Remote Debugging: Some of these debug channel viewers support sending the debug output over the network so you can remotely view debug output!
Note
Because this feature uses the standard Windows Debug Output, when used inside of the Dataflex Studio, debug output is captured by the Studio and you will not be able to capture output using a 3rd party utility. Unfortunately Dataflex Studio does not display this output although it captures it.
Service Mode
Starting with v17.1 Mertech’s drivers contain a service mode. This service mode causes certain things to be recorded to the event log. The events that are recorded to the event log are:
Failed Login: When a login fails for any reason, the details of the failed login are recorded to the event log with the exception of the password used.
License Issue: When a license is missing, invalid or expired, an event log entry is recorded. This log contains information related to what license was found or was not found, along with when it expired, etc.
Missing Dependency: Recent versions of the drivers all use a lazy loading mechanism that allows us to report when a specific DLL is missing or cannot be loaded.
Rename field: The dialog that can popup when using DF_FIELD_NAME to rename a field in a circumstance the driver doesn’t allow will generate an event log.
Oracle Password Expiration: The warning dialog about an expiring Oracle password is now an event log entry.
Additionally, service mode also blocks some other dialogs but doesn’t create event entries. This is to prevent a non-interactive application like a Thriftly app or a Webapp from locking up while waiting for the dialog to clear. These dialogs are: The restructure dialog, login dialog, and auto-reconnect “repeat command” dialog.
To enable service mode, set the environment variable MDS_DRVR_SVC_MODE to 1. Service mode is automatic when we detect a non-interactive application, but because this can sometimes fail, it is best to use the MDS_DRVR_SVC_MODE environment variable.
Because of the way Windows event logging works, to get the most information out of the driver, you’ll need to register the driver with Windows so that it can use the driver to provide additional details about the event. This can be done by using regsvr32: regsvr32 /i /n /s <driver-name>.dll. Although this command is normally used to register COM objects with the system, it can also be used for other types of registration and that is what is being done here.
When service mode is enabled, an entry will be recorded in the trace file as well to indicate that.