Quick Start Guide
Flex2SQL Unicode Edition is made up of two basic components:
The Flex2SQL Unicode Migration Utility that takes your existing DataFlex tables and indexes and migrates them to your target SQL backend
Database drivers that work with the DataFlex runtime and handle all client/server connection and database operations
This Quick Start Guide is intended to get you started by walking you through the migration of a small Dataflex application.
Installation and licensing
The Flex2SQL Unicode Edition Setup Wizard guides you through the installation process. Follow the prompts, to accept the software license agreement, to select where the Mertech SQL drivers are installed and to accept the terms of the MySQL license agreement (this is required even if your intent is to use another driver).
If you are evaluating the product, a limited license is installed. If you want to request a fully functional license file, contact Mertech Data Systems.
A Sample Migration
The example below uses files from the DataFlex Order Entry example to create matching tables and indexes on Microsoft SQL Server and then copies the data to the newly created tables. The procedure consists of logging into the target database, choosing the files to be converted, and then running the Convert Database command.
Login to the Target Database
Select the Flex2SQL Unicode Edition Migration Utility shortcut from the Windows Start menu.
Enter the name or IP address (including instance name if applicable) of your server.
Note: Oracle users select the Help button and print instructions in the License Count View for ORAFlex topic. License control scripts must be run before performing a migration.
Type the user name and password for this session.
Note: MS SQL users can omit the user name and password and select Trusted Connection to rely on Windows Authentication.
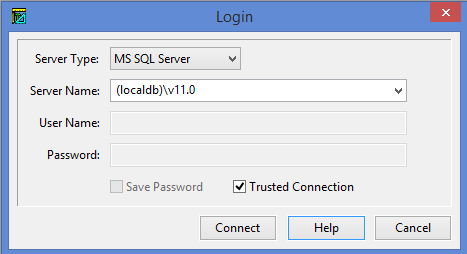
Click Connect to log into the server.
If you logged into PostgreSQL, MS SQL Server, or MySQL, select the target database from the Select Database dialog box.
Choose the files to be converted
Select File | Open | Select Workspace from the menu bar.
Choose the desired VDF version and Workspace (Order Entry Example in the example below) and then click Select.
Click Select All to choose all the DataFlex files in the filelist for conversion. You can also use Ctrl+click to select individual file(s).
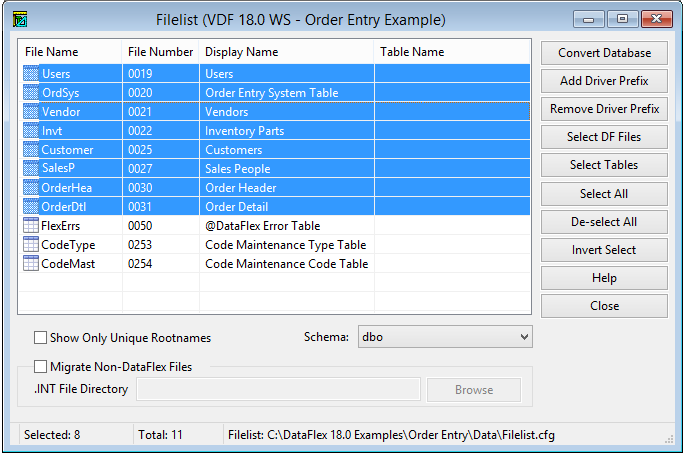
Note: Do not include the FlexErrs, CodeType, and CodeMast DataFlex tables in the migration. These files are only used by DataFlex and are never required in the SQL database.
Run the Convert Database command
Click Convert Database.
Change the default migration preferences if required.
Choose Create Tables & Indexes and Migrate Data, and then click Convert All.
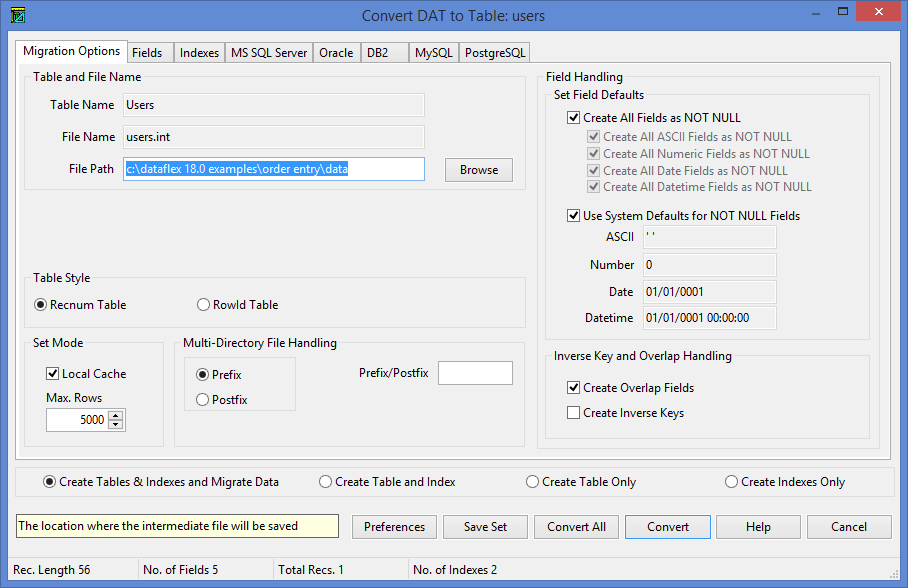
Review the Migration Report (Reports |Migration Report) when the conversion is complete. The Migration Report displays any errors that may have occurred during the migration.
What happens during the migration?
The Flex2SQL Unicode Edition Migration Utility converts the selected files to the target database, adds a driver prefix (for example, F2S_MS) to the root file name entry in filelist.cfg and generates an intermediate file for each converted file (for example, Users.INT). Examine the Filelist dialog box after the conversion is complete. Notice that the selected files names have a driver prefix.
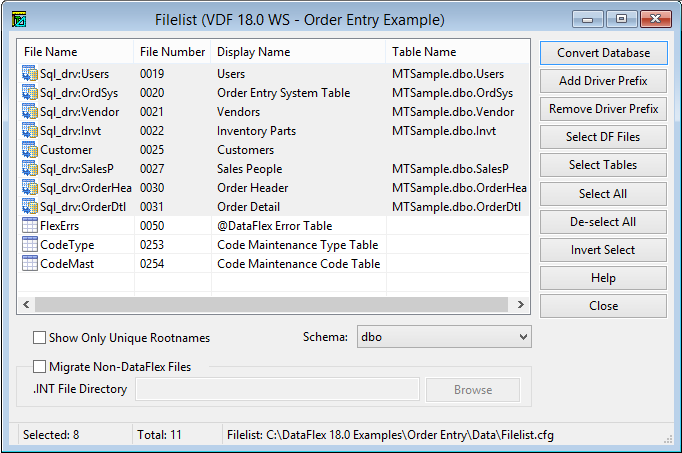
When an open command is issued for a file containing a driver prefix, the DataFlex runtime passes the open operation to the Mertech driver associated with the file. The driver uses information in the INT file to connect to and open the converted SQL table.
Running your program
After all the files are converted to the target database, the next step is to add the appropriate login command to your program. This is the only change that is required. There are three ways to do this:
Mertech provides an automatic login dialog box that pops up if you are trying to open a converted file and you are not logged into the SQL database. This option is useful for testing.
Add login code to your program (for example): Login “(localdb)v11.0” “” “” “f2s_ms”
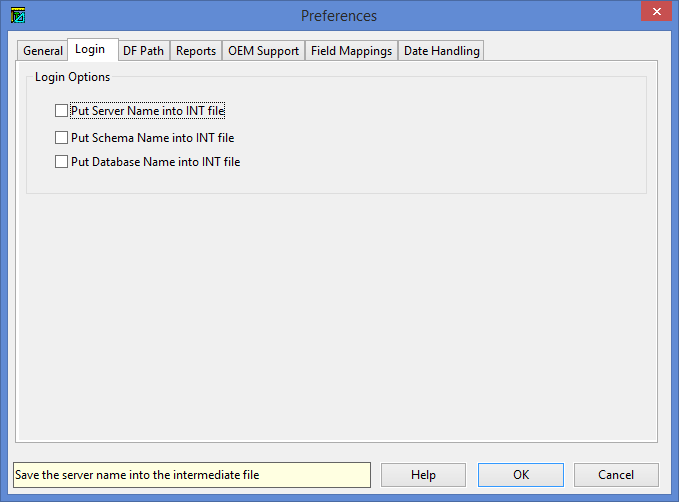
Hard code the login details (SERVER_NAME, SCHEMA_NAME, and DATABASE_NAME) in the INT file or mertech.ini file. This can be done by setting options in the Tools | Preferences |Login tab before migration.
What next?
The Flex2SQL Unicode Migration Utility offers much more than the basic migration shown in this example. With it you can:
Create scripts to be used for high-speed data migration using native tools like SQL*Loader and Bulk Copy
Create scripts to commit changes directly to the backend or to generate DataFlex restructure code for distribution to remote sites
Browse both DataFlex and SQL data
Create and modify tables and indexes on the backend
Transfer DataFlex relationships to the server backend or to retrieve relationship information from the server into the .INT files
Use the multi-directory file handling option to create files with the same name in the backend database
The Flex2SQL product also includes commands developed by Mertech to allow you to optimize your programs for faster data access. By using embedded SQL Statements to complete processes that were before done by looping over tables in DataFlex code, you can improve the performance of certain processes within your application by many orders of magnitude. The commands to help you do this along with many others, are included in mertech.inc, see Command Reference for documentation on available commands.