Restructure Table
How To Access:
Toolbar item

See Also: Create Table
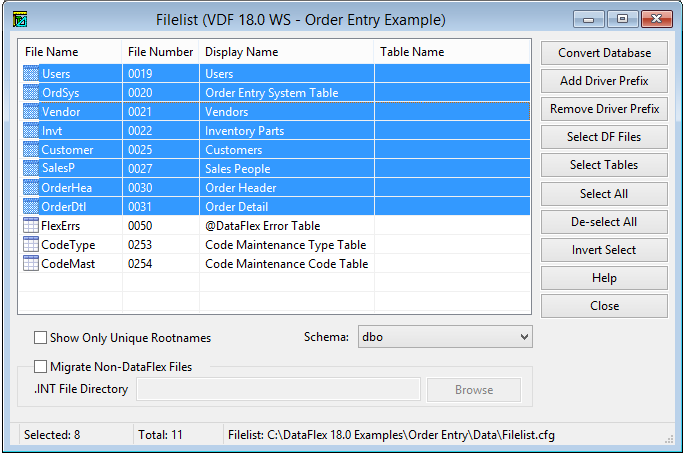
To restructure a table(s), select one or more tables in the Filelist dialog dialog box. The table cannot be a DataFlex (.DAT) file.
Restructing a Table
Although you cannot You can modify the table name, physical name or file number, you can change the _Restructure_TableStyle.
Add, modify and delete fields in the Fields Tab.
Add, modify, and delete indexes in the Indexes Tab.
Update the table in the Table Tab.
When all changes are complete for the selected table, click the Next button. If multiple tables were selected, the next table is displayed for update. When all updates are complete, clicking Next displays the Restructure Results dialog box. Note: If you click Cancel and there are unsaved changes, you are prompted Are you sure you want to cancel? Click Yes to close the dialog box without saving your changes. Click No to continue working in the Restructure Table dialog box.
In the Restructure Results dialog box, you can choose to save your changes in scripts that can be compiled and sent to remote sites to perform automatic restructuring, or click Commit to make changes directly on the server and to generate the DataFlex .FD and .INT files.
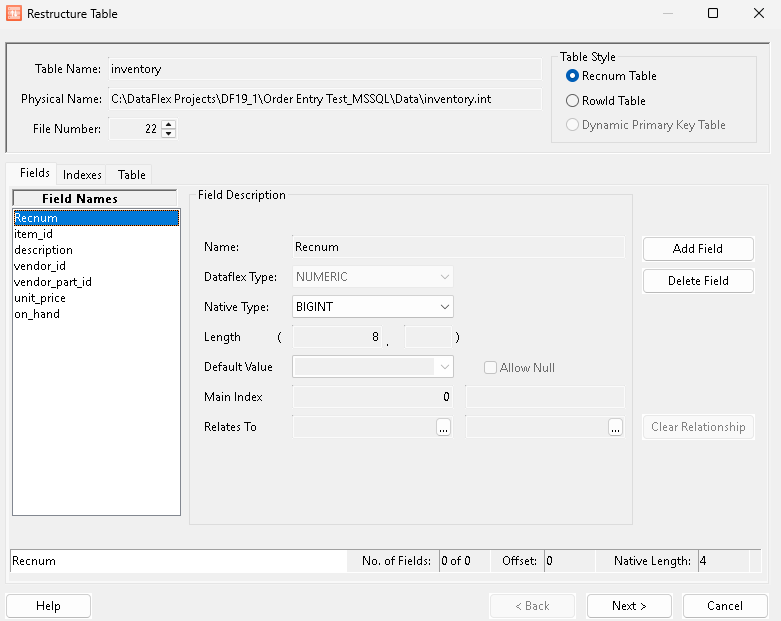
Table Style
On the upper portion of the dialog, the only area that is enabled is the Table Style. You can select from the following types of tables:
RECNUM table emulates DataFlex record processing where a unique consecutive positive number (record number) is used to identify each record. The record number designates a record’s relative position in the table. This is useful for legacy applications.
rowId table does not use RECNUM to uniquely identify a record, but instead relies on you specifying one or more fields that when combined create a unique record identity. Standard tables use the RowId concepts in Visual DataFlex instead of the older RECNUM concept. A RowId table can take advantage VDF RowId functions.
Dynamic Primary Key Table: see below. This option is NOT available for MySQL/MariaDB (see note below).
Dynamic Primary Key Table
A dynamic primary key (DPK) table uses a GUID (Globally Unique Identifier), also referred to as UUID (Universally Unique Identifier), field as the primary key. A GUID is a 128-bit quantity generated by an algorithm that nearly guarantees to make it unique.
DPKs are supported by MS SQL, Oracle and PostgreSQL.
Server |
Data Type |
Notes |
|---|---|---|
MS SQL |
uniqueidentifier |
Supported on all tables that do not use insert triggers. Insert triggers prevent the driver from returning the newly created primary key. UUIDs can still be used, just not as the primary key. |
Oracle |
RAW(16) |
RAW (16) is the native type for a GUID in Oracle. Not supported for Oracle running on AIX. |
PostgreSQL (version 8.2 and above) |
uuid |
The “uuid-ossp” library, which enables you to generate UUID values server-side, must be installed for DPK support in PostgreSQL. The DPK radio button is disabled if this library is not installed. A tooltip hint over the disabled radio button explains how-to install the library. |
Note
MySQL & MariaDB do not have the interface required to support server-side dynamic primary keys. You can however, still use UUIDs but you need to generate them in your code.
To change the table style to Dynamic Primary Key Table:
If the table is currently a Recnum Table, select RowID Table.
Select Add Field and choose Native Type GUID.
For Default Value, use the drop-down list to select an available server-side function to generate the UUID.
Uncheck Allow NULL.
Select the Indexes tab, add the new GUID column to an index and select it as the Record Identity and Primary Key.
Note
The procedure to convert a table to a DPK table displays in a tooltip when you hover the mouse over the Dynamic Primary Key Table radio button.
Fields Tab
Allows you to add modify or delete fields in the table.
Field Names: Lists the names of the fields in the table. Click Add Field to add a new field to the end of the table. Select a field name then click Delete Field to delete the field from the table.
Name: Field selected in the Field Names panel.
DataFlex Type: The DataFlex field type for the column. Defaults to ASCII for new fields but can be changed using the pulldown list.
Native Type: The assigned field type mapping on the target database. Allowed types are available using the pulldown list.
Length: The number of bytes in the DataFlex field. If the field is an overlap field, click <…> or press the <F4> button to display the Define the Overlap definition popup dialog box.
Define the Overlap definition popup dialog box: Use the Define the Overlap definition popup dialog box to enter the overlap field information. This includes the starting field and offset, the ending field and offset and the total length of the overlap field in bytes.
Default Value
If the field is to be created as NOT NULL (automatically NOT NULL if the field is part of an index), then the Default Value specified here is inserted into the column if a value is not provided by the application (left blank). You can select a GUID generator function from the drop-down list, or enter another server-side function to be used to create the ID for the field if a value is not provided by the application.
|
|

Main Index
Used to select the primary index from the list of available fields.
Click <…> or press the <F4> button to display the Select the main index popup dialog box
Select the Main Index from the list in the popup dialog box. Press OK to select the index and to close the dialog box.
Relates To
Selects the table and field for which this field is a foreign key.
If there is already a relationship, click Clear Relationship to delete an existing relationship.
Position the cursor in the first text box, Relates To, then click <…> or press the <F4> button to display the Select a File popup dialog box.
Select the table and press OK. The second textbox will now be enabled.
Position the cursor in the second text box, then click <…> or press the <F4> button to display the Select the field to fetch popup dialog box.
Select the field and press OK.