Step by Step Migration using the GUI Migration Utility
Take the following steps to migrate your existing Btrieve or Pervasive.SQL database to a Microsoft SQL Server, Oracle or PostgreSQL database using the GUI Migration Utility.
NOTE: If your source code is stored in XML format use MigrateUniPaasData, the Mertech command-line migration tool that works with Magic uniPaaS applications.
NOTE: Before you begin see Validate Data Definition Files using DDF Validator.
1. Migrate Data to SQL backend using the Migration Utility
In order to run your application with the target database, you must first migrate your database to the target database using the Migration Utility. The database Migration Utility creates the table, copies the data, and creates the required indexes by using the entries in the DDF files. That is why an accurate DDF is essential to the overall application migration process.
Suggestion: Assuming Pervasive.SQL and the data reside on a machine other than the new server, run the migration process on the Pervasive.SQL machine. This splits up the processing requirements of SQL and the data conversion.
An example of migrating tables in the Pervasive.SQL Demodata database to an MS SQL Server backend is given in this section. The migration steps for Oracle and PostgreSQL are similar; only the driver name and the login information are different.
Login to the target database
1. Select Mertech’s ISDBC Drivers for Btrieve | Migration Utility from the Windows Start menu.
The Login dialog box appears, as shown in Figure 2.
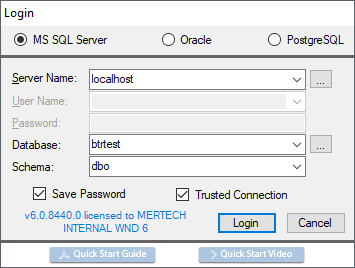
Figure 2 Login Dialog Box
2. Select the Mertech driver you are using — MS SQL Server, Oracle or PostgreSQL.
Note: If an error occurs when you select the driver (for example “Error loading driver!”) or the BTR2SQL Migration Utility closes unexpectedly, the most likely cause is that there is a problem with the SQL client installation or a BTR2SQL driver is not in the expected location. Mertech driver dlls (sql_btr.dll for MS SQL, ora_btr.dll for Oracle, or pgs_btr.dll for PostgreSQL) must be found on the Windows PATH and are usually located at <Program Files>\Mertech Data Systems\DB Drivers\Btrieve\bin.
3. In the Server Name field, type the name of the server to which you are logging in to. If you are using SQL Server, click the button next to the text box to automatically search for available servers on the network.
4. In the User Name field, type the name of the user. This is only needed if you are using SQL Server Authentication to logon to the server. If you are using Windows authentication, you can click Trusted Connection. Please note that Trusted Connection must be set up properly by your network administrator to allow you access to the SQL Server instance.
5. In the Password field, type the password for the user (not needed for trusted connection).
6. Select the Database you want to connect to. The default database for the user is selected automatically. Click the button next to the text box to display the Select Database dialog box.
Click Login to log into the server.
Select and migrate files
NOTE: See Setting Migration Preferences to choose global options for tracing, field mappings, field default values and more.
IMPORTANT: Oracle users see Analyzing Oracle Storage Requirements before starting the migration.
1. Select File | Select File.DDF… and open your DDF file. The File Selection dialog box lists all of the entries in your DDF. At this stage, you still need your Btrieve engine to read the database files.
2. Select a single file or multiple files to migrate by highlighting the entries in the dialog box.
Right-click> to display the popup menu.
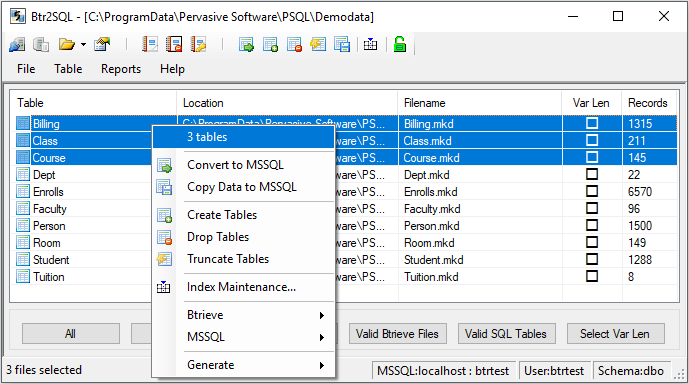
Figure 3 File Selection Dialog Box (with right-click popup menu)
4. Select Convert to driver. The Convert Data Files dialog box appears (the format of the dialog box depends on whether one of more files is selected).
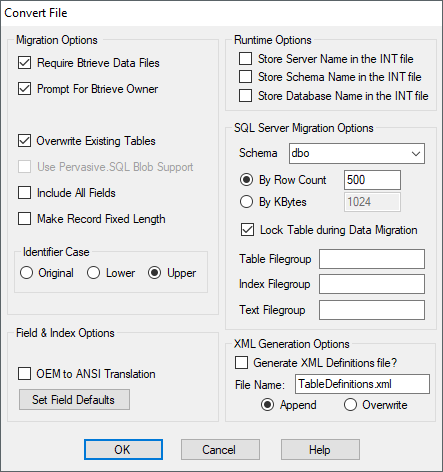
Figure 4 Convert Data Files Dialog Box
Click OK to begin migrating the data files.
What happens during the migration?
The GUI Migration Utility creates the tables and associated indexes and copies the records into the table on the SQL server. The utility also generates an .INT file that corresponds to each migrated data file. This auxiliary file is stored in the same directory as the data files. The .INT file contains schema information that the ISDBC driver will use when accessing the data in SQL.
The icon in the list changes to reflect the migration. An icon with an
arrow pointing to the right  indicates that a file has been
migrated to the target backend.
indicates that a file has been
migrated to the target backend.
NOTE: At this point, MS SQL, Oracle, and PostgreSQL tools will be used to access the data. However, after you test the application against the SQL backend, you may discover that the table definitions are misaligned. If this is the case, then it is best to use the same DDF editor that you used previously to correct the schema, and then you can migrate the affected table(s) to SQL again.
2. Verify the Migration
Run Mertech’s Migration Validator to validate the migration process. The Migration Validator uses the standard Btrieve API to read rows from Btrieve and from SQL simultaneously and compare the data buffer returned. A message displays in the output if any mismatch has been found.
3. Substitute the Btrieve Access dlls
In order for the application to access the new data on the SQL database, the Mertech versions of the Btrieve access dlls (wbtrv32.dll or w3btrv7.dll) must be used. The easiest way to do this is to copy the two dlls from the installation folder to the location where the application EXE is run. Choose the appropriate installation subfolder depending on your target SQL backend: <Program Files>Mertech Data Systems\DB Drivers\Btrieve\deploy\ subfolder. If you are not sure if your application uses wbtrv32.dll or w3btrv7.dll, then copy both.
There are several locations where you can put the Mertech drivers, but the application must be able to find the Mertech version of the dll using the standard Windows dll search order. Typically the Mertech version of wbtrv32.dll or w3btrv7.dll is placed in the directory with the application executable. Windows searches here for dependencies first, so this guarantees that the correct version is located. If the driver dll is not placed in the directory with the application, it must be found by Windows dll search. This is slightly different on each version of Windows, but in general, this is the search order:
The application’s executable directory-
The system directory (%windir%\system32, or %windir%\SysWOW64)-
The 16-bit system directory (%windir%\system)-
The Windows directory (%windir%)-
The current directory
The directories that are listed in the PATH environment variable. Note that this does not include the per-application path specified by the App Paths registry key. The App Paths key is not used when computing the dll search path.
Important: The license file also must be found in the system PATH. We recommend that you place the sql_btr.cfg, ora_btr.cfg, or pgs_btr.cfg file in the same folder as the access dll. For example, if your application executable file is located in c:myappbin and you will be accessing data in Oracle:
Copy <Program Files>\Mertech Data Systems\DB Drivers\Btrieve\deploy\oracle\w3btrv7.dll and ora_btr.cfg to c:\myapp\bin.
Replace the dlls that currently reside in the PVSW\BIN folder. This ensures that the Mertech dll is used. However, many of the Pervasive tools will no longer function. For instance, if the table definitions need to be corrected, the original Pervasive dlls must be restored. Be sure that you save a copy of the original dlls before you replace them.
4. Run Your Application
Once the correct dll is substituted, run your application. The Server Login dialog box, shown in Figure 5, displays and indicates that the program is now accessing the new backend.
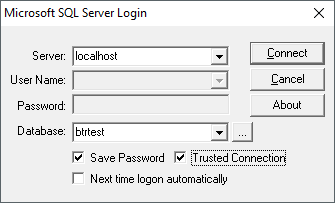
Figure 5 Server Login Dialog Box
At this point, the application, without modification, should be sending and receiving data from the newly chosen backend. The original MicroKernel files, the Pervasive.SQL engine and any Btrieve/DDF tools are no longer needed.
As an example, an application written for the Pervasive Demodata database issues the B_OPEN API to open c:\pvsw\demodata\billing.mkd. The Mertech version of the Btrieve access dll is loaded and used for the B_OPEN because the Mertech dll is located in the application’s folder. The Mertech driver finds the billing_mkd.INT file, reads it, and then displays a login dialog box, which allows the user to input a user id and password for the selected SQL backend. If this dialog box does not display, either the Mertech dll was not found or the user id and password were previously saved.
See also Specifying the target backend
You may choose to shut down the Pervasive services and stop the workgroup engine. The application should continue running because the data is now being provided by the new SQL server.
5. Deploy the Application
If your application will not be accessing Btrieve and SQL data simultaneously when the application is deployed, the Pervasive components, located in the pvsw directory, are no longer needed. Rather than including the entire Pervasive.SQL installation, the Mertech dll (w3btrv7 or wbtrv32) is installed in the application directory. No registry keys or COM registration is required. The Btrieve data files and DDFs are also not needed.
The SQL client (MS SQL Server Native client, Oracle OCI client, or PostgreSQL client) must be installed on the system running the application.
The .INT files must also be copied to the system running the application. The application will continue doing a B_OPEN on billing.mkd, for instance, even though billing.mkd does not exist. The Mertech driver dll will read billing_mkd.int instead.
See Scenarios using the GUI Migration Utility for an example of a typical directory structure
6. Optimize the Application for SQL
Mertech provides a rich set of extended SDK and optimization tools to allow for post-migration optimization using embedded SQL and the ability to call stored procedures and functions to call server-side components. Using stored procedures and functions allows you to implement enterprise-wide business rules across your separate applications.
Embedded SQL gives you the power of SQL (using the Btrieve API) to create highly constrained data-sets quickly without the need to write extensive client-side code. You can get rid of hundreds of lines of client-side code by effectively using of a few lines of embedded SQL code.
Using server-side components and embedded SQL is not required, but it can reduce the network traffic by keeping the processing on the more powerful servers and transferring only the data that you need to the client-side.
Another enhancement that can save much network traffic is the reduction of data read. Most Btrieve applications are programmed to read the entire record whether it needs 1 or all of the data fields. Reading all of the fields is inefficient and thus the SDK provides a set of calls to restrict the list of fields needed. The field list can be changed at any time to provide the fastest access time during particularly time-sensitive operations.
See Also BTR2SQL SDK