The BTR2SQL GUI Migration Utility assists developers during and after a
data migration. It contains all the features that a developer needs to
migrate an existing Btrieve application to the target backend. Mertech
designed the user-friendly, intuitive user interface with the assumption
that you do not require detailed knowledge of the target backend.
BTR2SQL works with the files listed in the FILE.DDF. You must select a
file before you can perform any database-related operation on the file.
You can select either a single file or multiple files to perform the
operation in a single or batch mode.
Main Screen Display
After selecting the FILE.DDF, the display lists of all of the data files
in the FILE.DDF. This is the main area for completing all tasks related
to data migration. You can perform actions on one or more data files.
This dialog box allows you to identify and select files you want to
migrate. The icon next to the file name indicates whether or not the
file has been migrated. An icon without an arrow indicates that the file
is still in the native Btrieve format while an icon with a green arrow
shows that a table has been migrated to the target RDBMS. The status
line at the bottom of the dialog box displays the number of files
currently selected and the target server and database.
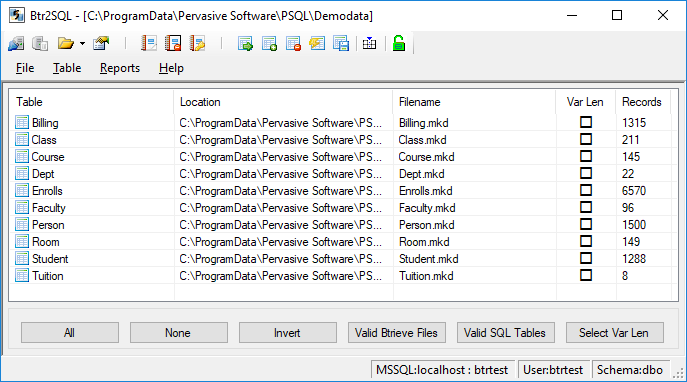
Figure 7 File Selection Dialog Box
All
Selects all entries in the list
None
De-selects all selected files in the list
Invert
Toggles the entries. All marked entries become unmarked and all unmarked
entries become marked.
Valid Btrieve Files
Selects all of the data files in the FILE.DDF that have a valid and
accessible Btrieve data file.
Valid SQL Tables
Selects all of the data files that have been migrated and checks for
errors in accessing tables on the SQL backend.
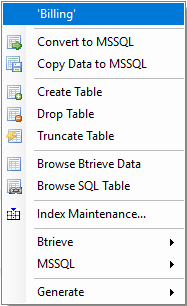
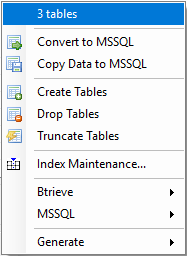
Convert Data Files
<Right-click> on any file/files in the File Selection dialog box and
choose one of the options available from the popup menu. Procedures for
these menu options are described on the following pages. The displayed
menu depends on whether one or multiple files are selected.
One File Selected |
Multiple Files Selected |
|
|
Figure 11 File Options - Popup Menu
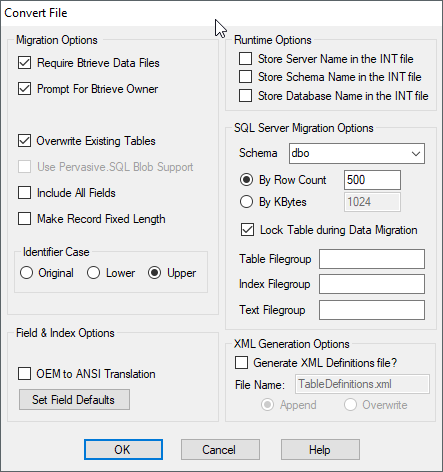
The first option, Convert to database, creates the table, copies the
data and then adds indexes, all in one operation. It can operate on one
file at a time or multiple files. The Convert Data Files dialog box is
different depending on whether one file or multiple files are selected.
One File Selected |
Multiple Files Selected |
|
|
Figure 12 Convert (Data) Files Dialog Box
NOTE: When multiple files are selected for migration, all selection
options are available on the main tab. The fields and indexes are
migrated as defined in the DDFs. When you select OK to convert
multiple files, the program migrates each file separately, instead of as
a batch process.
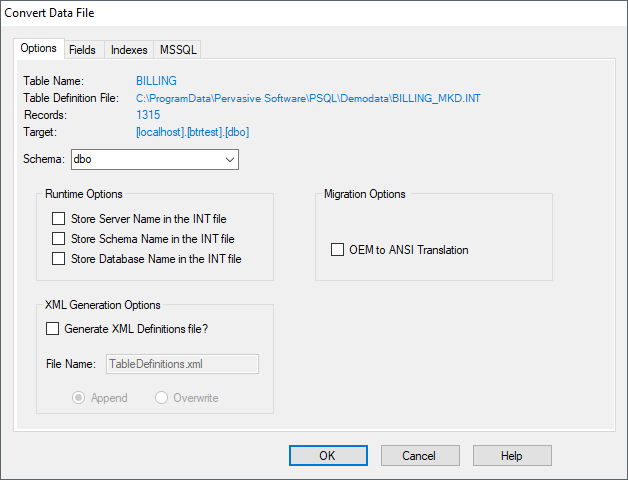
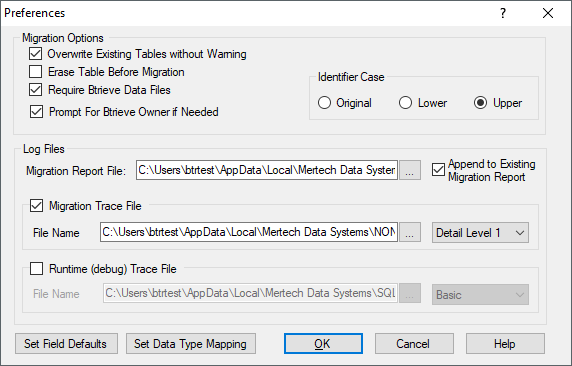
Options Tab
Figure 13 Convert File – Options Tab
Get Server Name from Login
If you uncheck this option, the server name is stored in the INT file
during migration. If you leave this option checked, the server name is
NOT stored in the INT file during migration. At runtime, the driver
looks for the server name in 1) the INT file, 2) the mds.ini file. If
the server name is not stored in either file, the driver displays the
Login dialog box.
Get Schema Name from Login
If you uncheck this option, the schema name is stored in the INT file
during migration. If you leave this option checked, the schema name is
NOT stored in the INT file during migration. At runtime, the driver
looks for the schema name in 1) the INT file, 2) the mds.ini file. If
the schema name is not stored in either file, the driver displays the
Login dialog box. Not used in Oracle.
Get Database Name from Login
If you uncheck this option, the database name is stored in the INT file
during migration. If you leave this option checked, the database name is
NOT stored in the INT file during migration. At runtime, the driver
looks for the database name in 1) the INT file, 2) the mds.ini file. If
the database name is not stored in either file, the driver displays the
Login dialog box.
OEM to ANSI Translation
When checked, converts the OEM character set to the ANSI character set.
OK
Selecting OK starts the conversion process.
Fields Tab
The Fields tab allows you to change the data type mapping assigned to
a column when the table is created on the SQL server. The Fields tab
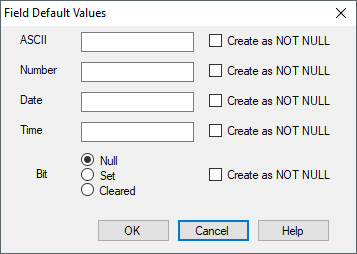
also lets you enter a default value for fields defined as NOT NULL.
Fields created as NOT NULL need a default value that you provide if a
value is not provided by the program or if the field is left blank.
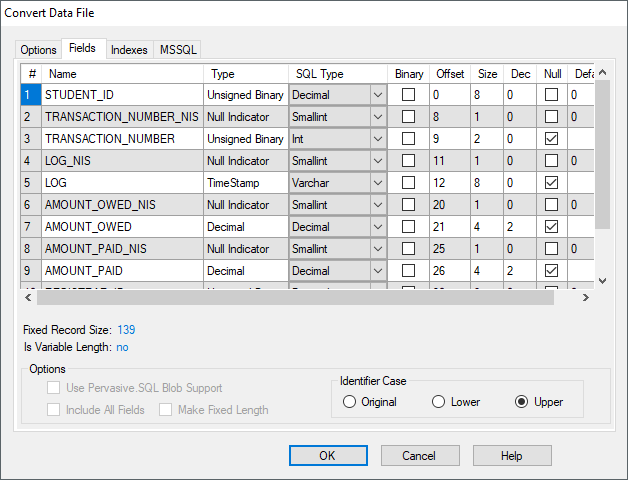
Figure 14 Convert File – Fields Tab
Name
Displays the alphanumeric identifier for the field (the column name).
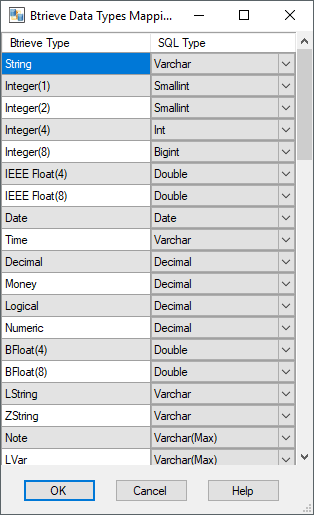
Type
Displays the Btrieve data type assigned to the field.
SQL Type
Displays the default field-type mapping that will be used when creating
the SQL table during migration. You can modify this setting.
Binary
Allows you to tag string fields as binary during migration. Check this
option if a string field contains non-ASCII values (<32 or >128).
Offset
Displays the field offset in the record buffer.
Size
Displays the field length in bytes.
Dec
Used for numeric fields, displays the number of decimal spaces the field
can contain.
Null
Indicates whether NULL values are allowed in the field. You can change
this setting, however, fields participating in an index cannot be NULL.
Default
Allows you to enter a default value to be used for a NOT NULL field when
the field is left blank.
Indexes Tab
The indexes tab shows details of all keys and the fields that comprise
the keys.
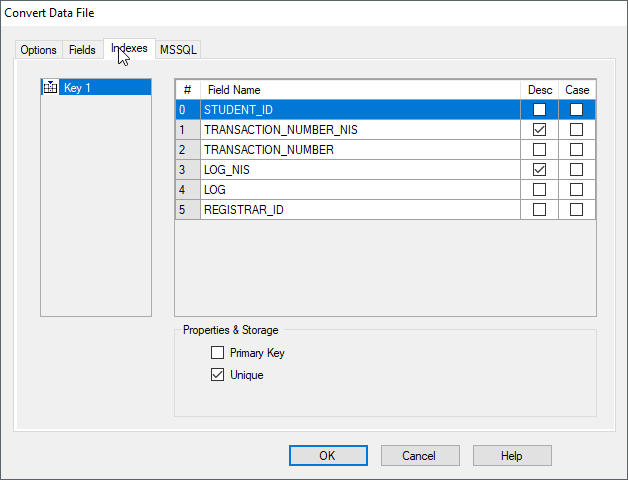
Figure 15 Indexes Tab
Field Name
Displays all the fields that make up the currently selected key.
Desc
Check to indicate this field is descending.
Case
Check to indicate this field is case insensitive.
NOTE: The PostgreSQL citext module provides the case-insensitive
character string type CITEXT that allows for case insensitive fields
without the need for inverse key columns.
Properties and Storage (Oracle Only)
Primary Key
Check to indicate this index is a primary key. All SQL databases perform
exceptionally well with a correctly selected Primary Key. By default,
the driver sets Index 1 in your Btrieve file as the primary key on the
server. You can choose any index, as long as it is unique.
Unique
Check to indicate this index is unique.
NOTE: All Mertech drivers support auto-increment fields on the
server-side. However, because of the limitation on MS SQL Server, it
allows only one auto increment field per table. If you have an auto
increment field and you expect that table to be accessed from other
non-Btrieve programs, be sure to *`enable the auto-increment trigger <#enable-trigger-to-handle-auto-increment-and-inverse-key>`__
*for the table.
Initial
Displays the size of the first extent for the index tablespace on the
Oracle server.
Next
Displays the size of the next extent to be allocated when the initial
space is full.
% Free
Displays the space reserved in each of the cluster’s data blocks for
future expansion. The value of the parameter is expressed as a whole
number and interpreted as a percentage.
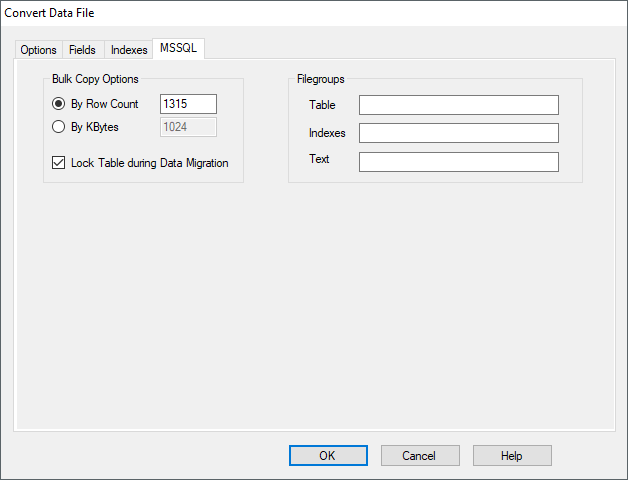
Server-Specific Tab
The server-specific (MSSQL and Oracle in the example) tab contains
settings that determine how the data is loaded.
Oracle users run the Analyzing Oracle Storage Requirements option and
then use the drop-down list in the Oracle tab to assign different
locations for the data and indexes for the currently selected tables.
|

|
Figure 16 MSSQL Tab |
Figure 17 Oracle Tab |
Table Operations
The following table operations are available from the Table menu and
from the popup menu displayed when you right-click file(s) in the File
Selection dialog box.
Copy Data to Table
This option copies records from a Btrieve data file to a table that has
already been created using Mertech’s BTR2SQL tool. Use this only if the
table exists on the server. The following copy options can be selected:
Lock Table: Check to lock the table and prevent updates to the table
while the data is being copied to the SQL server.
Erase Table: Check to erase the contents of the target table before
the contents of the Btrieve data file are copied. If this option is
NOT checked, rows from the Btrieve file are appended to any existing
data.
Bulk Copy Operations: Migrating records to the database is much more
efficient using a bulk copy operation. MSSQL lets you determine
whether to commit updates based on the number of rows per batch or
kilobytes per batch.
Create Table
Creates an empty table and associated indexes without migrating the
data.
Select this option when you want to use SQL*Loader for high-speed data
migration or for creating blank tables that are later populated by the
application.
Drop Table
Deletes a table in the target database for each data file that is
selected in the FILE.DDF.
Truncate Table
Erases the contents of the table in the backend database that has the
same name as the data file currently selected in the FILE.DDF.
Browse Btrieve Data
Displays the data for the highlighted file. The data is read from the
native Pervasive / Btrieve file. You can also. You are prompted for the
Pervasive database name. Enter the logical name for the Pervasive
database that contains the selected file (for example, Demodata).
NOTE: The OLEDB provider for Pervasive.SQL must be installed to
access the Btrieve files. The OLEDB provider is needed only for the data
browsing function.
Browse SQL Table
Displays the data for the highlighted table. Retrieves data from the
migrated SQL table.
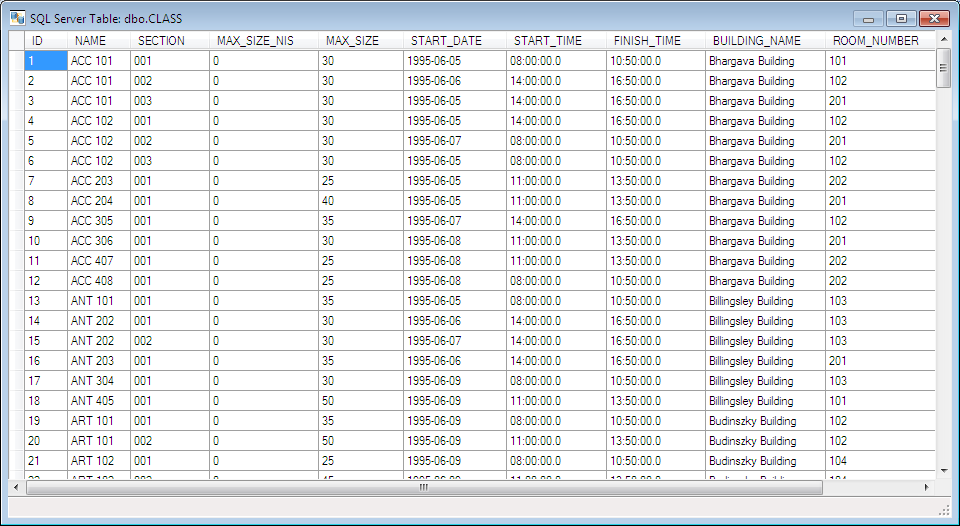
Figure 18 Browse Data Dialog Box
NOTE: You can also double-click a filename to browse the data. If
the file has not yet been migrated, the Btrieve file is opened. If the
file was already migrated, the SQL table is opened.
Index Maintenance
This option allows you to check the index definition of each file,
whether or not the indexes have been created properly, and to re-create
or drop indexes on a file.
The most common reason why a Btrieve program does not perform optimally
after migration to an SQL database backend is because the indexes were
not properly created or not created at all. The driver fails to create
indexes for a number of reasons, but the two most important are
duplicate data and running out of disk space. For example, a Btrieve
table might contain dates like 12/12/99 and 12/12/1999 in two separate
records. Since BTR2SQL converts all dates to four-digits during
migration, such data causes a unique constraint violation if this date
field is part of an index.
For this option to work properly, make sure that your Btrieve files are
present for comparing the database structures.
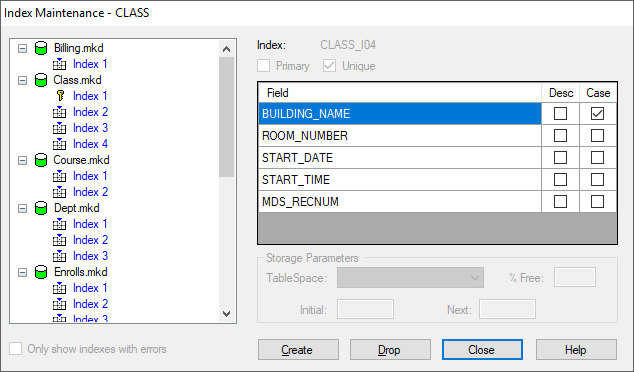
Figure 19 Index Maintenance
Select all the files in the File Selection dialog box.
<Right-click> on a file and select Index Maintenance.
BTR2SQL searches each Btrieve file and compares it to the index created
on the server. If the index is not created, BTR2SQL displays it with a
red check mark next to it.
If the index was not created, you can drop and re-create the table or
drop and recreate the index using the Index Maintenance dialog box.
Specify Btrieve Ownership
In Btrieve, you can define an owner for a data file for security
purposes. BTR2SQL cannot access these files unless the owner (password)
is specified while opening these files. For migration purposes, BTR2SQL
requires that you specify the owner name for these files to successfully
migrate the data to the SQL Server.
The File Selection dialog box, shown in Figure 7, displays a lock icon
for the files requiring the owner specification.
1. In the File Selection dialog box, select a file with  next to
it.
next to
it.
<Right-click> and select Btrieve | Specify Owner Names…
The Specify Btrieve Ownership dialog box appears.
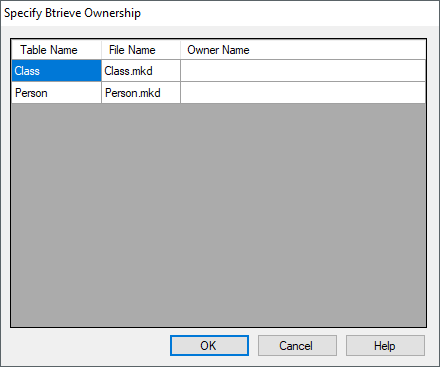
Figure 20 Specify Btrieve Ownership
Type the owner’s information in the Owner column.
Press OK.
Number
Number assigned to the file in FILE.DDF. This column is non-editable.
File Name
Name given to the Btrieve file. This column is non-editable.
Owner
Files owner information. The specified owner information is verified. If
it does not match, you are prompted again to enter the information for
that file.
Analyzing Oracle Storage Requirements
IMPORTANT: This feature should be used before ANY data migration is
done. Running out of disk space during data migration creates a
situation where Btr2SQL does not properly create or migrate data.
This option dynamically calculates the server storage requirement for
each individual table based on the Btrieve file sizes. The sizes
indicated are in bytes. If the tablespace is not large enough, the
tablespace is highlighted in red. In these cases, you can use Oracle’s
Storage Manager utility to increase tablespace sizes.
NOTE: You must have rights to alter the tablespaces, even the ones
to which you are migrating. You can change user rights using Oracle’s
Enterprise Manager.
1. In the File Selection dialog box, select a Btrieve file(s) to be
migrated to the SQL backend.
2. <Right-click> and select Oracle Specific Options |
Analyze Storage Requirements.
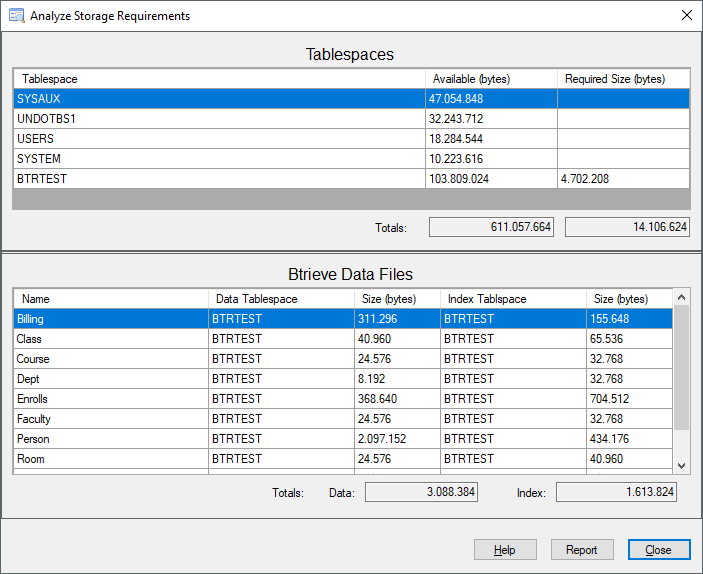
Figure 21 Analyze Storage Requirements (Oracle Only)
Tablespaces
Tablespace
All tablespaces the current user can access.
Available (bytes)
Total remaining space for the tablespace. You can compare this to the
Required Size of the tablespace to see if there is enough space.
Required Size (bytes)
The space required by the Btrieve files selected. This turns red if the
required size is larger than the available size.
Totals
Remaining server-side space in bytes and the space required by the
currently selected files.
Btrieve Data Files
Name
The name assigned to the selected Btrieve file.
Data Tablespace
The tablespace currently assigned for the migrated Btrieve data.
Recommendation: It is recommended that you create index and data
tables on two separate tablespaces, preferably on separate hard drives.
You can choose different tablespaces for index and data tables, and
assign individual tables to different tablespaces using the
Oracle tab in the Convert File dialog box.
Size (bytes)
The space required on the server-side for the Btrieve table data.
Index Tablespace
The tablespace currently assigned for the migrated Btrieve indexes.
Size (bytes)
The space required on the server-side for the Btrieve index data.
Totals Data
Total space designated for data tablespace.
Totals Index
Total space designated for index tablespace.
Create Text File for Loader
SQL*Loader is the fastest way of populating new Oracle tables from a
Btrieve file. BTR2SQL generates a text file from the Btrieve data file
and also generates all the necessary control scripts for running
SQL*Loader. At the end of this process, a file called loader.bat is
generated that contains commands to run the loader scripts (generated by
SQL*Loader) for each file. This loader can be run in client mode or
server mode depending on whether or not the machine you are executing
the loader scripts on is also the server. If not, you must select the
client mode.
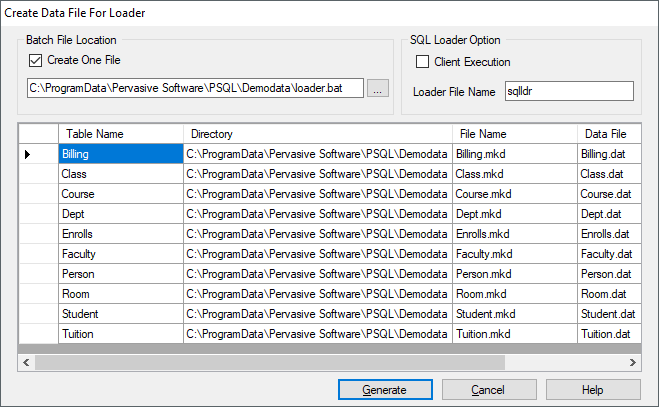
Figure 22 Create Text File for Loader (Oracle Only)
1. In the File Selection dialog box, select the Btrieve file(s) to be
migrated to the SQL backend.
2. <Right-click> and select Oracle Specific Options | Create
Text File for Loader.
Batch File Location
Create One File
If this option is checked, BTR2SQL creates a single batch file to load
all the selected files. If this option is not checked, BTR2SQL creates
individual batch files to load the data. Use the Browse button to select
the location for the batch file.
SQL Loader Option
Client Execution
Indicates whether BTR2SQL executes the loader on the client or server
machine. If the machine from which you are running the SQL*Loader is a
client machine, then select the Client Execution option. This
automatically puts the login information in the loader.bat file. For
faster loading, Mertech recommends that you use the server mode option
and run the loader.bat directly on the server, if possible.
You must run Analyze after Loader Execution after loading the data
into tables using SQL*Loader.
Loader File Name
The name assigned to the SQL*Loader file.
In the Grid
For every file selected in the File Selection dialog box:
Table Name
The assigned table name.
Directory
Path to the selected Btrieve file.
File Name
The name of the Btrieve file.
Data File
The name that will be assigned to the text file if the exporting option
is checked.
Direct
The load type. If checked, then the load type is direct. If unchecked,
then the load type is conventional. A conventional path load executes
SQL INSERT statements to populate tables in an Oracle database. A direct
path load eliminates much of the Oracle database overhead by formatting
Oracle data blocks and writing the data blocks directly to the database
files. Typically, direct load is faster than conventional load.
Export
Indicates whether or not you want to export data. If this option is
checked, then BTR2SQL generates text files containing the data.
Analyze after Loader Execution
SQL*Loader is a specialized way of populating a table. SQL*Loader
utility is run separately or asynchronously from BTR2SQL. Certain
information pertinent to the Btrieve database and, consequently, to the
Btrieve program (i.e. auto-increment sequence) needs to be adjusted
before a Btrieve program can function properly. BTR2SQL goes through
each file and compares the number of records migrated for each file to
the number of records in Btrieve. If it finds a mismatch in the number
of records, BTR2SQL identifies the records that did not match.
The log file generated by SQL*Loader, called <filename>.log, usually
contains the information pertaining to which record(s) were NOT
migrated. BTR2SQL does not analyze the information or logs that it
generates. In order to ensure that the loader migrated all data
correctly, this option must be run. This option also corrects the
auto-increment sequences.
NOTE: If you do not execute ***Analyze after Loader Execution* after
you migrate the database using SQL*Loader, then sequences and certain
system statistics will be off and your application will not be able to
perform FIND operations correctly.
1. In the File Selection dialog box, select all the files that were
migrated to Oracle.
2. <Right-click> on a file and select Oracle Specific Options
| Analyze after Loader Execution.
Adjust Sequence Definition
This option adjusts the start value of the sequence created. The
sequence is the order of the values in the auto-increment column.
NOTE: When SQL*Loader is used to populate a table, the
auto-increment values have to be adjusted. This needs to be done
manually by using the Analyze after Loader Execution option.
Enable Trigger to Handle Auto-Increment and Inverse Key
This option enables a trigger that handles auto-increment fields and the
inverse key on the specified table. If BTR2SQL created a table with the
auto-increment column and you are using Mertech’s drivers with your
Btrieve program, Mertech’s drivers automatically handle auto increment
values. However, if you access and change the same table by a
non-Btrieve program, then the auto-increment sequence is disturbed. To
avoid this, use this option to enable a trigger that automatically fires
when a record is added, deleted, or updated and perform the necessary
operations for auto-increment handling.
To support descending index segments and case sensitive indexes, the
drivers make use of a special key called inverse key. BTR2SQL creates
inverse keys during data migration. Since this feature is specific to
the driver, any updates to index fields in a migrated table using
Mertech’s drivers require that you also update the inverse correctly,
much the same as in auto-increment handling. Oracle and MS SQL Server
use a trigger for maintenance of the inverse key values in the index.
Through BTR2SQL, you can enable or disable this trigger. If the trigger
is in place on a table, then the driver does not insert its own values
and allows the values from the trigger to be used. There is only one
trigger that handles both auto-increment and inverse key handling.
1. In the File Selection dialog box, select the file to have the trigger
enabled.
2. <Right-click> and select Oracle Specific Options | Enable
Trigger to Handle Auto-Increment and Inverse Key.
Handling of AutoInc Fields
AutoInc fields always retain their value during migration.
AutoInc fields are managed the same way whether records are added
using B_INSERT or B_FAST_INSERT: If the value of an AutoInc field is
zero the next sequential number is assigned, otherwise the value
provided in the dataBuffer is used.
Disable Trigger to Handle Auto-Increment and Inverse Key
This feature disables the trigger that Oracle and MS SQL Server use to
handle the maintenance of inverse keys in the index of a data file.
1. In the File Selection dialog box, select the file to have the trigger
disabled.
2. <Right-click> and select Oracle Specific Options | Disable
Trigger to Handle Auto-Increment and Inverse Key.
Table Definition Files from Btrieve/Pervasive.SQL
This option creates the .INT file for each data file selected. The .INT
file contains information about the structure of a specific data file.
Select a file(s) in the File Selection dialog box.
2. <Right-click> and select Generate | Table Definition Files
from Btrieve.
Generate SQL Script for Creating Tables
This option generates SQL scripts for creating tables and indexes. This
allows more control and security over the process of creating tables.
The output is sent to a file, <filename.SQL> that can then be run from
SQL*Plus in Oracle or ISQL in MS SQL Server.
Select a file(s) in the File Selection dialog box.
2. <Right-click> and select Generate | SQL Script for Creating
Tables.
Select the location for the SQL script.
Press OK.

 button to browse for the location where you want to
save the migration report file.
button to browse for the location where you want to
save the migration report file.