Scenarios using the GUI Migration Utility
This section describes migration scenarios that can be used to consolidate data directories, maintain data segregation, perform load balancing and more.
A Basic Migration
The Mertech Migration Utility creates an SQL server database from a Btrieve/Pervasive.SQL transactional database to allow Pervasive developers to offer all the features available on SQL servers without changing source code or compromising on performance.
A sample Pervasive data directory is shown below.
C:\MyApp\DATA
  FIELD.DDF
  FILE.DDF
  INDEX.DDF
  MARKETING.MKD
  PURCHASING.MKD
  SALESPEOPLE.MKD
The DDF files contain the database file names (FILE.DDF), field names including offsets and data types (FIELD.DDF) and indexes (INDEX.DDF). The following steps are taken to migrate a Btrieve/Pervasive.SQL transactional database to an SQL database.
The developer:
Launches the Migration Utility
2. Logs in by entering the target server name, user name and database name.
3. Selects the FILE.DFF containing the tables to be migrated to the target database.
The Migration Utility:
1. Reads the DDF files to determine the structure for the migrated tables.
2. Uses this information along with the login data to create the tables on the SQL server.
Copies the existing data to the new tables.
Stores the table structure in intermediate (INT) files.
The same data directory after migration Tables created in the target SQL database
C:\MyApp\DATA                                   MARKETING

FIELD.DDF                                       PURCHASING

FILE.DDF                                        SALESPEOPLE

INDEX.DDF

MARKETING.MKD

MARKETING_MKD.INT

PURCHASING.MKD

PURCHASING_MKD.INT SALESPEOPLE.MKD

SALESPEOPLE_MKD.INT
What happens during runtime?
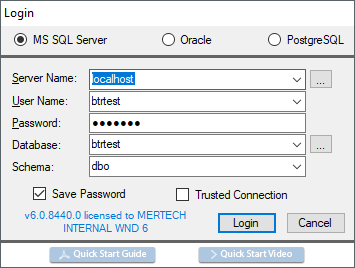
When you launch the BTR2SQL Migration Utility, a Login dialog box prompts for a server name, user name and database name. These entries determine the target backend for the migrated files.
Similarly, when the operator runs the application, a Server Login dialog box displays to again obtain the target backend information. When the application issues a B_OPEN to open a file (for example MARKETING.MKD), the Mertech driver locates the associated INT file (MARKETING_MKD.INT) in the data directory and uses the login information along with the table structure stored in the INT file to connect to and open the converted SQL table.
See also Consolidating INT files on the client and Automatic application login
Creating tables on the fly
In addition to using the INT file to connect to and open a converted table, the Mertech driver also uses the INT file to create tables at runtime.
When an application issues a B_CREATE, the driver looks to see if an INT file already exists for the file. If there is an existing INT file, the driver compares its contents with the index definitions in the new create structure. If they look like a match, the driver uses the definitions in the INT file to create the table on the server. This allows you to have pre-existing INT files (with full field definitions) for temp tables for instance.
There may be times when you do not want an existing INT file to be used, in that case you can set the keynum value for B_CREATE:
B_CM_OVERWRITE_IGNORE_INT_FILE= -6
Opposite this, perhaps you want the driver to *always* use the definition in the INT. Two more flags force this behavior and the FILESPEC in the dataBuffer is completely ignored:
B_CM_OVERWRITE_FORCE_INT_FILE =-99
B_CM_NOOVERWRITE_FORCE_INT_FILE=-100
To prevent an INT file from being deleted when a table is dropped, you can set the PERMANENT_INT token in the INT file to YES (the default setting is NO).
PERMAMENT_INT YES
See also B_CREATE API
Common folder layouts
It is common in the Pervasive environment to create files with the same name residing in different folders. For example the C:MyAppDATA directory might contain subdirectories for the central, east and south regions of a company. Each subdirectory might contain the marketing, purchasing and sales person information for that region.
 C:\MyApp\DATA
  CENTRAL\
  FIELD.DDF
  FILE.DDF
  INDEX.DDF
  MARKETING.MKD
  PURCHASING.MKD
  SALESPEOPLE.MKD
EAST\
  FIELD.DDF
  FILE.DDF
  INDEX.DDF
  MARKETING.MKD
  PURCHASING.MKD
  SALESPEOPLE.MKD
SOUTH\
  FIELD.DDF
  FILE.DDF
  INDEX.DDF
  MARKETING.MKD
  PURCHASING.MKD
  SALESPEOPLE.MKD
1. Migrate each folder to a different SQL server. By definition, there will be multiple databases (refer to Distributing Tables to a Different Server, Database, or Schema).
serv1.db1.dbo.purchasing
serv2.db1.dbo.purchasing
2. Migrate each folder to a different database on the same server (refer to Distributing Tables to a Different Server, Database, or Schema).
serv.db1.dbo.purchasing
serv.db2.dbo.purchasing
3. Migrate each folder to a different schema name, or user on Oracle (refer to Distributing Tables to a Different Server, Database, or Schema).
serv.db1.user1.purchasing
serv.db1.user2.purchasing
4. Migrate all folders to the same server, database, and schema but attach a custom prefix to the table names (refer to Using a Custom Prefix or Postfix to Distinguish Tables).
serv.db1.dbo.cust1_purchasing
serv.db1.dbo.cust2_purchasing
Distributing Tables to a Different Server, Database, or Schema
The Mertech drivers work seamlessly in a distributed environment with multiple local or remote SQL Servers. Consider the following scenarios:
1. You choose to leave some files in Pervasive, while migrating others to an SQL backend. This could be an interim step during the migration process to test the migration. Or, a decision may have been made to leave private tables in Pervasive on the local machine, while common tables are stored on a central SQL Server.
2. In a second scenario, branch offices may have a local SQL Server, and also connect to a central master SQL Server, to access certain data that needs to be shared across branches.
3. Another choice might be made to distribute files on different physical hard drives on the server to balance the drive access.
4. Finally, security settings may dictate your choice of where tables are stored.
The Mertech drivers support all of these scenarios.
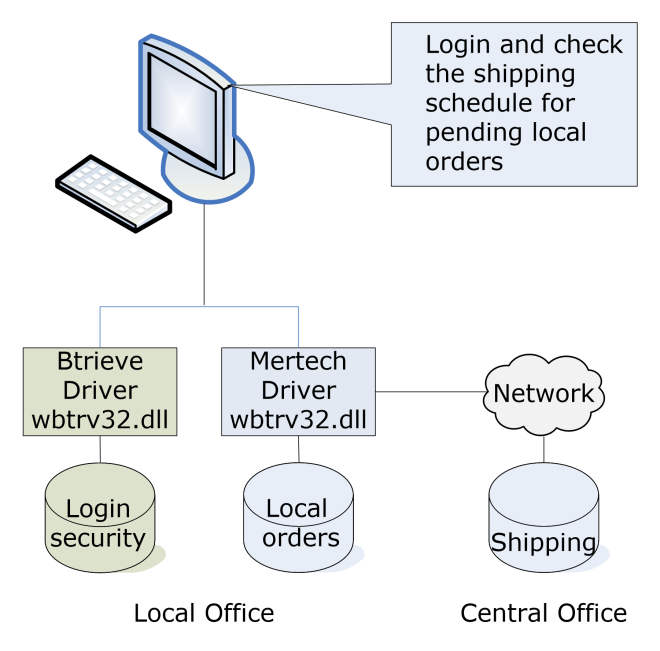
Figure 23 Distributed Environment
Start the Migration Utility and login.
Select the required File.DDF.
Select the individual files for this target database.
<Right-click> and choose Convert to Database.
5. Uncheck the Get Server Name from Login, Get Schema from Login and Get Database Name from Login check boxes so this information is stored in the INT files.
Click OK.
To migrate files to a different server:
choose File | Login and select a different serve1.
b. If required, choose a new FILE.DDF.
c. Select the individual files for this server.
d.
e. Uncheck the Get Server Name from Login, Get Schema from Login and
Get Database Name from Login check boxes so this information is stored
in the INT files.
f. Click OK.
8. To migrate additional files to a different database on the same
server:
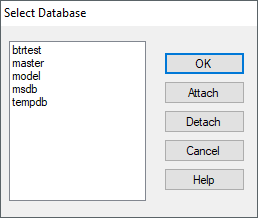
a. Choose File | Select Database and pick a different database
from the Select Database dialog box.
If required, choose a new FILE.DDF.
Select the individual files for the new database.
<Right-click> and choose Convert to Database.
e. Uncheck the Get Server Name from Login, Get Schema from Login and Get Database Name from Login check boxes so this information is stored in the INT files.
Click OK.
To migrate files to a different schema:
choose File | Login and provide different credentials.
NOTE: The selected user must have object creation rights.
If required, choose a new FILE.DDF.
Select the individual files for the new schema.
<Right-click> and choose Convert to Database.
e. Uncheck the Get Server Name from Login, Get Schema from Login and Get Database Name from Login check boxes so this information is stored in the INT files.
Click OK.
Other options
The BTR2SQL Migration Utility allows you an easy way to distribute an MS SQL database by selecting separate Filegroups for tables, indexes, and text storage (Convert File dialog box | MSSQL tab). Choosing separate Filegroups can streamline administration and increase data access speed.
The BTR2SQL Migration Utility also allows Oracle users to choose different tablespaces for index and data tables (Convert File dialog box | Indexes tab).
You can also choose to migrate some tables to one tablespace and other tables to another tablespace using the scripting option:
1. Use the BTR2SQL Table | Generate | SQL Script for Creating Tables option.
Modify the generated script as needed.
Run the modified script to create the tables.
Use BTR2SQL Table | Copy Data option to copy the data.
Using a Custom Prefix or Postfix to Distinguish Tables
Instead of using a different server, database, or schema as in the previous scenario, you might want to create separate tables for each region. To avoid the conflict in names, you can include either a prefix such as SOUTH_ or a suffix like _EAST. During the migration, the tables are created with this addition so “SALESPEOPLE” becomes “SOUTH_SALESPEOPLE” or “SALESPEOPLE_SOUTH”.
You specify the prefix or suffix in the data directory configuration file, mds.ini. The mds.ini file contains a number of settings to help automate and consolidate information needed by the BTR2SQL driver at runtime. Mds.ini is placed in the folder where the application’s data files are usually stored and works in conjunction with the INT files that have replaced the original Btrieve data files.
The Table-Prefix and Table-Postfix settings in the mds.ini file can be used to create unique table names.
The example Pervasive directory before migration
C:\MyApp\DATA
  CENTRAL\\
    FIELD.DDF
    FILE.DDF
    INDEX.DDF
    MARKETING.MKD
    PURCHASING.MKD
    SALESPEOPLE.MKD
  EAST\
    FIELD.DDF
    FILE.DDF
    INDEX.DDF
    MARKETING.MKD
    PURCHASING.MKD
    SALESPEOPLE.MKD
  SOUTH\
    FIELD.DDF
    FILE.DDF
    INDEX.DDF
    MARKETING.MKD
    PURCHASING.MKD
    SALESPEOPLE.MKD
Place a copy of the mds.ini file in each data directory.
NOTE: A sample mds.ini file can be found in the installation folder (<Program Files>\Mertech Data Systems\DB Drivers\Btrieve\sdk\samples).
2. Edit the mds.ini file to add the required prefix or suffix for the data directory. For example, edit the mds.ini file in the CENTRAL data directory to add the table prefix “CENTRAL_”.
[SQL_BTR]
INT-Folder=
Server=
Database=
Schema=
UseTrustedConnection=
User=
Password=
Table-Prefix=CENTRAL\_
Table-Postfix=
Migrate the files in each data directory to your SQL Server.
Open the Migration Utility, login and select the associated FILE.DDF.
Select the Pervasive files to be migrated.
<Right-click> and choose Convert to Database
Click OK.
This 1) creates the SQL tables with the entered prefix 2) copies the existing data into the SQL tables, and 3) generates the intermediate files (.INT).
The same data directories after migration Tables created in the target SQL database
C:\MyApp\DATA                           CENTRAL_BILLING
  CENTRAL\                              CENTRAL_PURCHASING
    mds.ini                             EAST_BILLING
    FIELD.DDF                           xEAST_PURCHASING
    FILE.DDF                            SOUTH_BILLING
    INDEX.DDF                           SOUTH_PURCHASING
    MARKETING.MKD                       SOUTH_SALESPEOPLE
    MARKETING_MKD.INT
    PURCHASING.MKD
    PURCHASING_MKD.INT
    SALESPEOPLE.MKD
    SALESPEOPLE_MKD.INT
  EAST\
    mds.ini
    FIELD.DDF
    FILE.DDF
    INDEX.DDF
    MARKETING.MKD
    MARKETING_MKD.INT
    PURCHASING.MKD
    PURCHASING_MKD.INT
    SALESPEOPLE.MKD
    SALESPEOPLE_MKD.INT
  SOUTH\
    mds.ini
    FIELD.DDF
    FILE.DDF
    INDEX.DDF
    MARKETING.MKD
    MARKETING_MKD.INT
    PURCHASING.MKD
    PURCHASING_MKD.INT
    SALESPEOPLE.MKD
    SALESPEOPLE_MKD.INT
Specifying the path to the INT files
In the scenario mentioned above, where a similar set of data files is duplicated to multiple subfolders, the INT files in each folder would be the same. While this is not a problem, it can be desirable to consolidate the files for easier maintenance.
When you migrate to SQL, you would deploy this structure (plus your application and Mertech driver):
C:\MyApp\DATA
   CENTRAL\
     mds.ini
     MARKETING_MKD.INT
     PURCHASING_MKD.INT
     SALESPEOPLE_MKD.INT
   EAST\
     mds.ini
     MARKETING_MKD.INT
     PURCHASING_MKD.INT
     SALESPEOPLE_MKD.INT
   SOUTH\
     mds.ini
     MARKETING_MKD.INT
     PURCHASING_MKD.INT
     SALESPEOPLE_MKD.INT
Or, you can add an INT-Folder entry to the mds.ini file to tell the driver where to find the common set of INT files, and instead deploy something like this:
C:\MyApp\DATA
 INTFILES\
   MARKETING_MKD.INT
   PURCHASING_MKD.INT
   SALESPEOPLE_MKD.INT
 CENTRAL\
  mds.ini
 EAST\
  mds.ini
 SOUTH\
  mds.ini
What this has done is eliminate the duplicated INT files. You now only have one folder to maintain for the INT files. You still need each data folder as you would in Btrieve, but you just need the mds.ini file in it with the appropriate INT-Folder and Table-Prefix entries.
[SQL_BTR]
INT-Folder=..\INTFILES
Server=
Database=
Schema=
UseTrustedConnection=
User=
Password=
Table-Prefix=CENTRAL_
NOTE: Instead of creating CENTRAL, EAST and SOUTH directories for the mds.ini files, you can use the MdsSetSetting API to create virtual mds.ini files in memory for each folder. For example:
MdsSetSetting("C:\MyApp\DATA\CENTRAL","INT_Folder","..\INTFILES")
MdsSetSetting("C:\MyApp\DATA\CENTRAL","Table-Prefix"," CENTRAL_")
See also Setting global and folder specific values programmatically
What happens at runtime?
When an application issues the B_OPEN API to open a file (for example MARKETING.MKD), the Mertech driver opens the mds.ini file in the data folder and uses the path defined by the INT-Folder entry to locate the associated INT file (..\INTFILES \MARKETING_MKD.INT). The driver reads the INT file and uses the information to connect to and open the converted SQL table.
A Real-life Example
A Btrieve application maintains a master catalog of office supplies and creates customer-specific catalogs on the fly at runtime. The application was migrated to MS SQL Server and the deployed data directory and database look like this.
Data directory The MS SQL database
C:\MyApp\DATA          MASTER
 INTFILES\
   MASTER_DAT.INT
The MASTER_DAT.INT file has the read-only attribute checked and the PERMANENT_INT token set to YES.
Customer “A” requests a supply list specific to his business. The application creates a new folder, CustomerA
C:\MyApp\DATA
  INTFILES\
    MASTER_DAT.INT
  CUSTOMERA\
The application also creates an mds.ini file in that folder.
C:\MyApp\DATA
 INTFILES\
   MASTER_DAT.INT
 CUSTOMERA\
   mds.ini
The mds.ini file contains the INT-Folder entry to show where the INT file is that contains the catalog structure. The mds.ini file must also provide credentials for accessing the server and some way to distinguish this catalog from other catalogs.
NOTE: The mds.ini file should be the only file in the CUSTOMERA folder. If the INT file is placed in the CUSTOMERA folder, the mds.ini INT-FOLDER entry is ignored.
This example mds.ini file uses Table-Prefix to distinguish this table from others. A different schema or user could also be used.
[SQL_BTR]
INT-Folder=..\INTFILES
Server=testserver
Database=testdb
Schema=dbo
Table-Prefix=CustA_
NOTE: Instead of creating the CUSTOMERA directory containing an mds.ini file, you can use the MdsSetSetting API to create a virtual mds.ini file in memory for CUSTOMERA. For example:
MdsSetSetting("C:\MyApp\DATA\CUSTOMERA","INT_Folder","..\INTFILES")
MdsSetSetting("C:\MyApp\DATA\CUSTOMERA","Table-Prefix"," CustA_")
See also Setting global and folder specific values programmatically
When the application issues a B_OPEN (C:\MyApp\DATA\CUSTOMERA\MASTER.DAT):
The driver opens the mds.ini file in the CUSTOMERA subdirectory and is redirected by the INT-Folder entry to the MASTER_DAT.INT file in the ..\INTFILES subdirectory.
The driver reads the MASTER_DAT.INT file and tries to open testserver/testdb.CustA_MASTER
The table does not exist so BTRIEVE Status 12 (File does not exist) is returned.
The application executes a B_CREATE
The driver repeats the same logic to locate the INT file (actually, the mds.ini and INT file are obtained from memory cache).
The driver creates the CUSTA_MASTER table based on the definitions in the MASTER_DAT.INT file.
Data directory The SQL database
C:\MyApp\DATA          MASTER
 INTFILES\             CUSTA_MASTER
   MASTER_DAT.INT
 CUSTOMERA\
   mds.ini
NOTE: If you want to use a unique schema/user or database instead of a table prefix for each catalog, you need to execute the SQL commands to do this before accessing tables from the new data folder. BTR2SQL includes an embedded SQL API.
See also B_CREATE API
Pros and Cons of each Migration Option
We have looked at several different ways to migrate tables to an SQL server. Below are some of the pros and cons of each.
Migrate each folder to a different server
serv1.db1.dbo.Hours serv2.db1.dbo.Hours
or a different database
serv.db1.dbo.Hours serv.db2.dbo.Hours
PROs
An easy way to perform load balancing by distributing the data across multiple computers, CPUs, hard disks, etc.
You can assign different user credentials to the different servers or databases.
CONs
Transactions will not cross multiple “customers” since the driver will have a unique connection to the database for each data folder.
There is more administrative overhead associated with backing up and maintaining the additional hardware and software.
When tables are migrated to multiple databases, the driver must have a separate set of connection(s) open for each database and must switch context each time a file from a different database is accessed. This can have an impact on the server. The context switching can also add performance overhead on the client depending on the order of calls and how frequently the switch is made.
Migrate each folder to a separate schema (users on Oracle)
serv.db1.user1.Hours serv.db1.user2.Hours
PROs
There is a clean distinction between “sets” of data.
You can assign different user credentials to each schema.
The list of tables in each schema is as small as possible.
CONs
There is a little more administrative overhead maintaining the additional schemas.
Migrate each folder using a different table prefix or suffix
serv.db1.dbo.East_Hours serv.db1.dbo.Central_Hours
PROs
This option is the easiest to implement.
The same approach works in all backends.
CONs
The table list can become very large.
It is harder to assign separate user access control.
Oracle’s 30 character limit on identifiers can severely hinder this option.
Consolidate the tables during migration
serv.db1.dbo.Hours
PROs
You have the fewest number of tables to maintain.
The same approach works in all backends.
CONs
The application code must be updated.
There is no separate user access control.
In summary, adding a table prefix or suffix during migration is the easiest and most-used migration option. However, if you have a lot of tables in each folder, the list on the server can be a bit overwhelming. For example, if you start with 300 data files and you have four customer folders, you end up with 1200 tables.
If your application requires different credentials on the server for different customer sets, then separating the tables by user/schema might be the easiest route.
Recap
During migration, the Migration Utility reads DDF files and stores corresponding table structures in table-specific INT files. The Migration Utility can also store the table path and other server credentials in the INT files.
The developer can create a configuration file, mds.ini, to provide additional access information specific to each data folder.
At runtime, the Mertech driver looks for the INT file and/or mds.ini file in the data directory and uses information in these files to connect to and open the SQL tables.
By selecting the appropriate conversion options you can use the BTR2SQL Migration Utility to distribute, segregate your migrated database.